It is a little-known fact that “ukulele” means “quarantine” in the Hawaiian language. It was a loan word, originally borrowed from a 19th century Portuguese sailor’s onomatopoeia that loosely translates to “there’s nothing to do on this island.”
Or maybe not. One can never know in a post-epistemological world, but I will absolutely choose to believe this despite any evidence to the contrary. I’m only certain of two things in this regard: Stewart MacDonald had tenor ukulele kits on sale, and building a ukulele is technically something to do.
I’ve scratch-built several instruments, but I’m a little out of practice and a kit seemed like a good balance between consuming a chunk of time and not having to stress about some of the more stress-inducing operations. The last thing I’d want to do would be to get all excited about building something, crack a side while bending it, and then have to wait forty days and forty nights for a new set to arrive, since all shipping companies have switched to “an arbitrarily long time by biblical standards” as their estimate for when packages containing something other than toilet paper will arrive. StewMac kits are also pretty nice, and the price was right.
I took a few photos of the build process and also failed to take photos of several key steps, so this is not a tutorial by any stretch, but eh, this is also something to do. The first step was gluing on the back braces.
Ukuleles are apparently built a lot like little guitars. There are some key differences, but the braces, which support the back and top, are laid out in a remarkably similar fashion. The back has less to do with producing sound and is not under any pressure from the strings, so it’s ladder braced—a few simple straight pieces of spruce laid out perpendicularly to the centerline of the back.
I braced the top next.

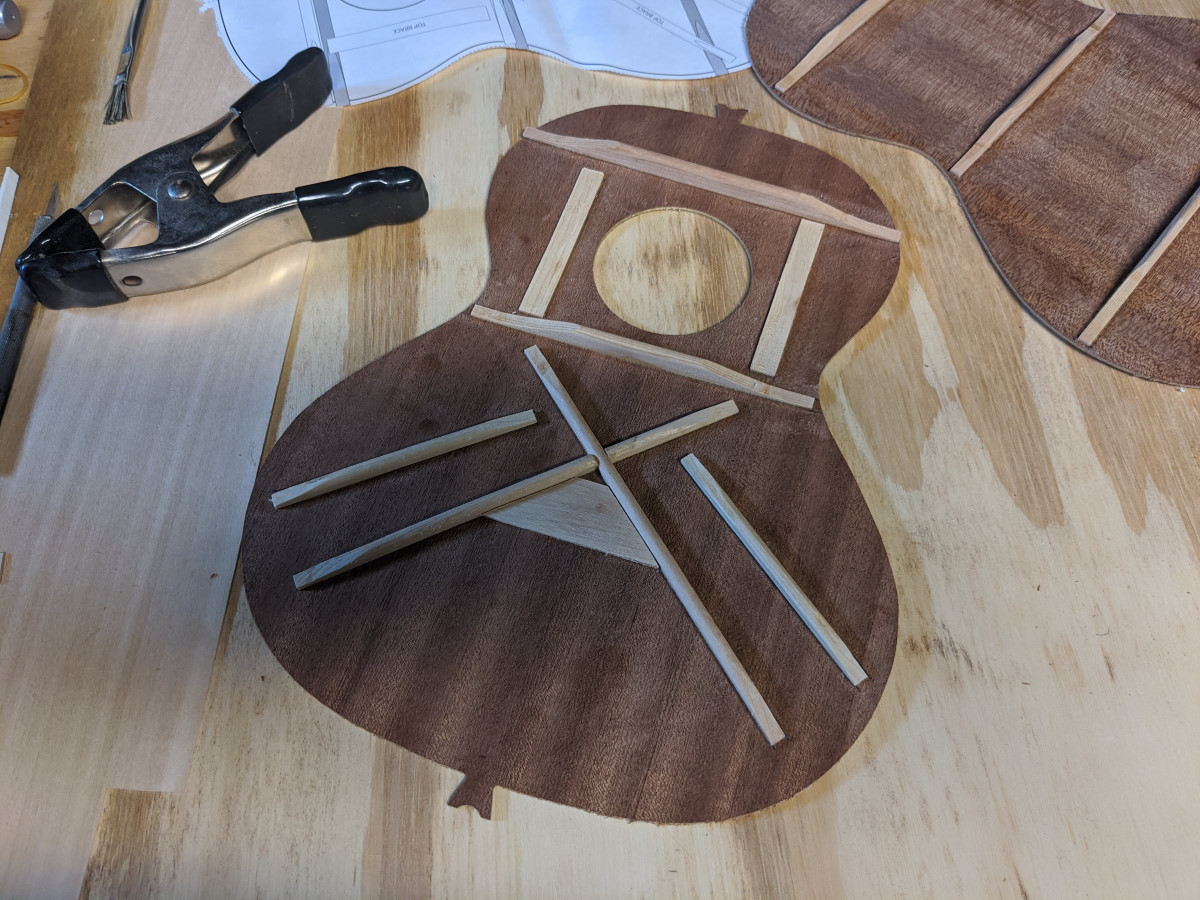
This was a multi-step process because the top bracing is more elaborate and required a lot of clamps. The top is X-Braced, a bracing pattern invented (perfected? popularized?) by C. F. Martin in the 1840s. It consists of two prominent crossed braces to support the lower bout of the soundboard, as well as several supporting braces and a plate that sits under the bridge.

This bracing arrangement has proven to enable solid structural integrity while still allowing the top to vibrate, which it must do to make noise. This balancing act is of critical importance on instruments with higher string tension, such as steel string guitars. I was a little surprised to see it on a nylon string ukulele, especially one made of plywood (since plywood is inherently stiffer than solid wood), but followed the plans as suggested. I did shave down the braces a little once they were all on, partially in a half-assed attempt to “tap tune” it, and partially because I have a rad curved chisel made by Ron Hock that I don’t get to use enough.
With the back and top complete, I moved on the sides. In production guitars, the sides are usually built in mold, but few people want to go through the trouble of making a mold for a one-off, and I’ve attempted several different workarounds for the hobbyist over the years. This kit suggested a very simple arrangement of blocks and dowels at the waist and the end blocks screwed to a piece of plywood with L-brackets, and it worked great (aided by the fact that the sides came pre-bent to pretty exacting specifications).
Once the glue on the end blocks had cured, I installed the lining. The lining strengthens the sides and provides more surface area on which to glue the top and back. I’d only ever used kerfed lining before, which is a sort of prepared stock that has been cut over and over almost all the way through with a saw, producing notches equal to the kerf (width) of the blade that enable it to easily bend to follow the curves of the sides. This kit came with un-kerfed lining, more like what you’d see on a violin. I was a little leery about using it as-is without bending it over a hot pipe with a spritz of water, but it seemed to work fine. I glued it in, using a few dozen clothespins as clamps.
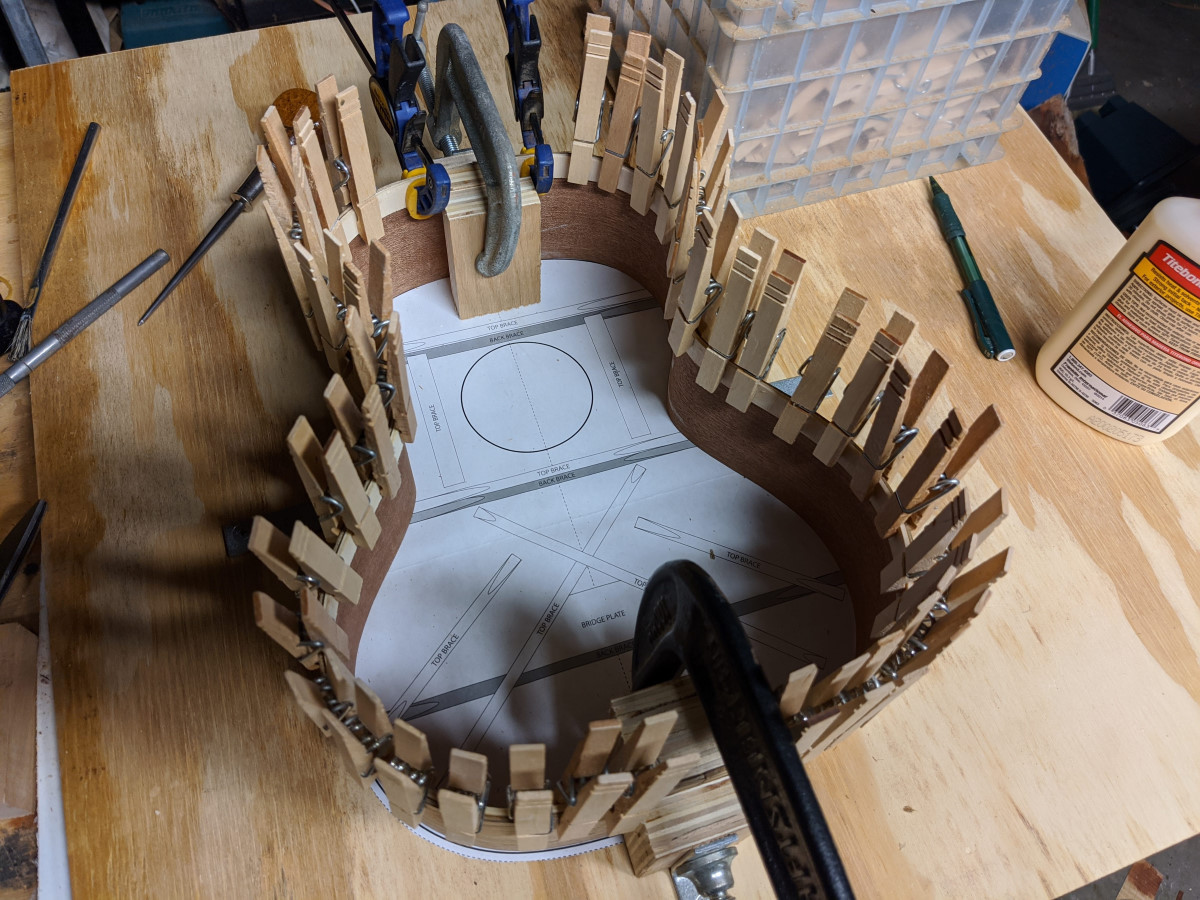
As an aside, I spent a lot of time during this operation having an extended conversation with myself about whether or not “clothespins” was really a word. Clothes…..pins? What? We already have things for pinning clothes, and they’re called pins. These are nothing like those. These should be called laundry clamps or something. I’m apparently deep in the throes of Land Madness, but several Google searches did confirm my initial suspicion that these are really called clothespins.
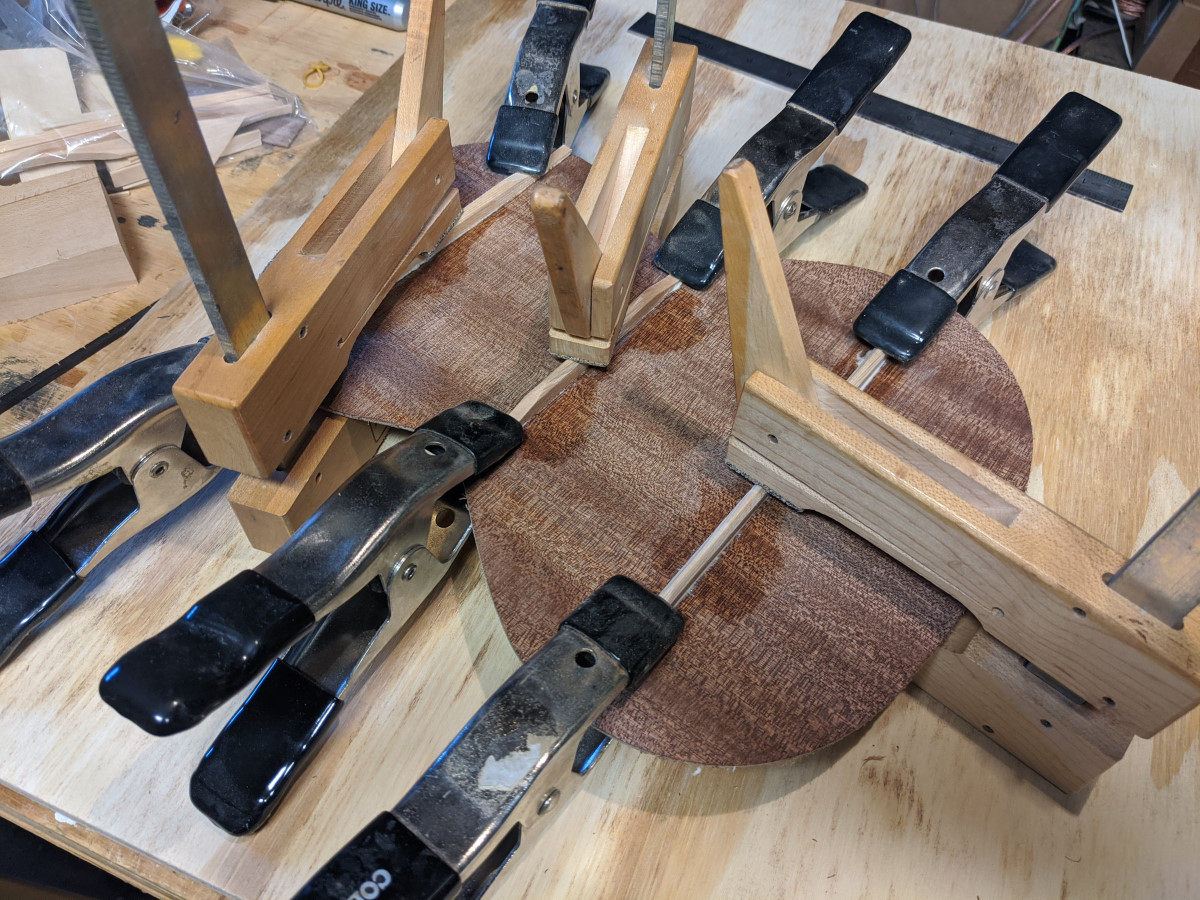
With the linings installed, I was able to level the sides in preparation for gluing on the back. Guitar backs and sides are usually slightly domed. It’s a huge radius, like 15 to 25 feet, so it’s subtle, but in the past, I’ve had to build customized sanding sticks to angle the edges of the sides to match the dome of the top and back. These ukulele plans called for no curve, so I just used my trusty “crappy plastic level with a piece of 1″ belt sander paper glued to it” to even everything up before gluing.
The plans also called for “clamping” the back and top on with a huge rubber band stretched between a bunch of screw hooks. This is one of the few steps in which I regret following the instructions. I own something like 50 spool clamps that I made out of carriage bolts, wing nuts, and several hours with a hole saw and some 3/4″ ply, and I think they would have done a much better job.
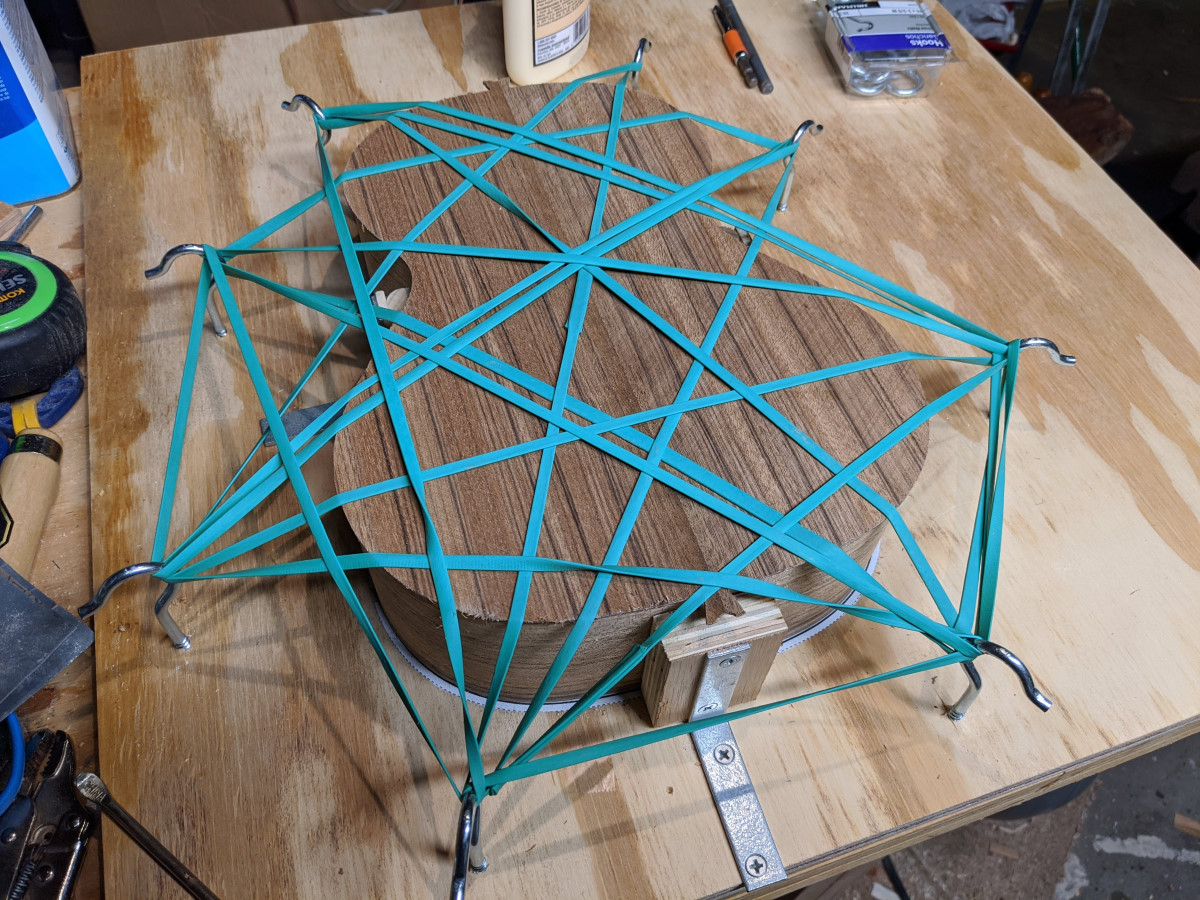
It technically worked, and would probably be fine for the builder working on a kitchen table without access to specialized tools, but there are a few spots where I think I could have gotten a better glue joint with spool clamps.
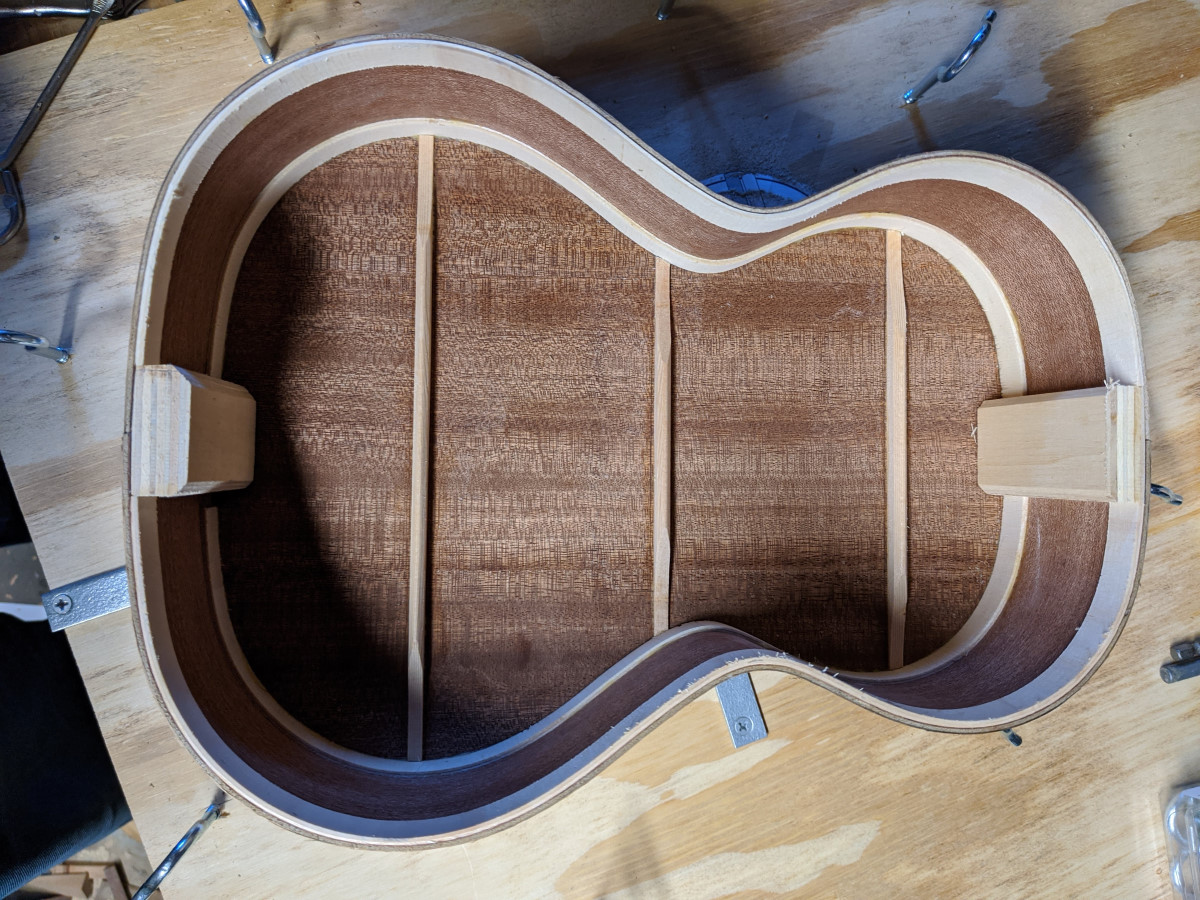
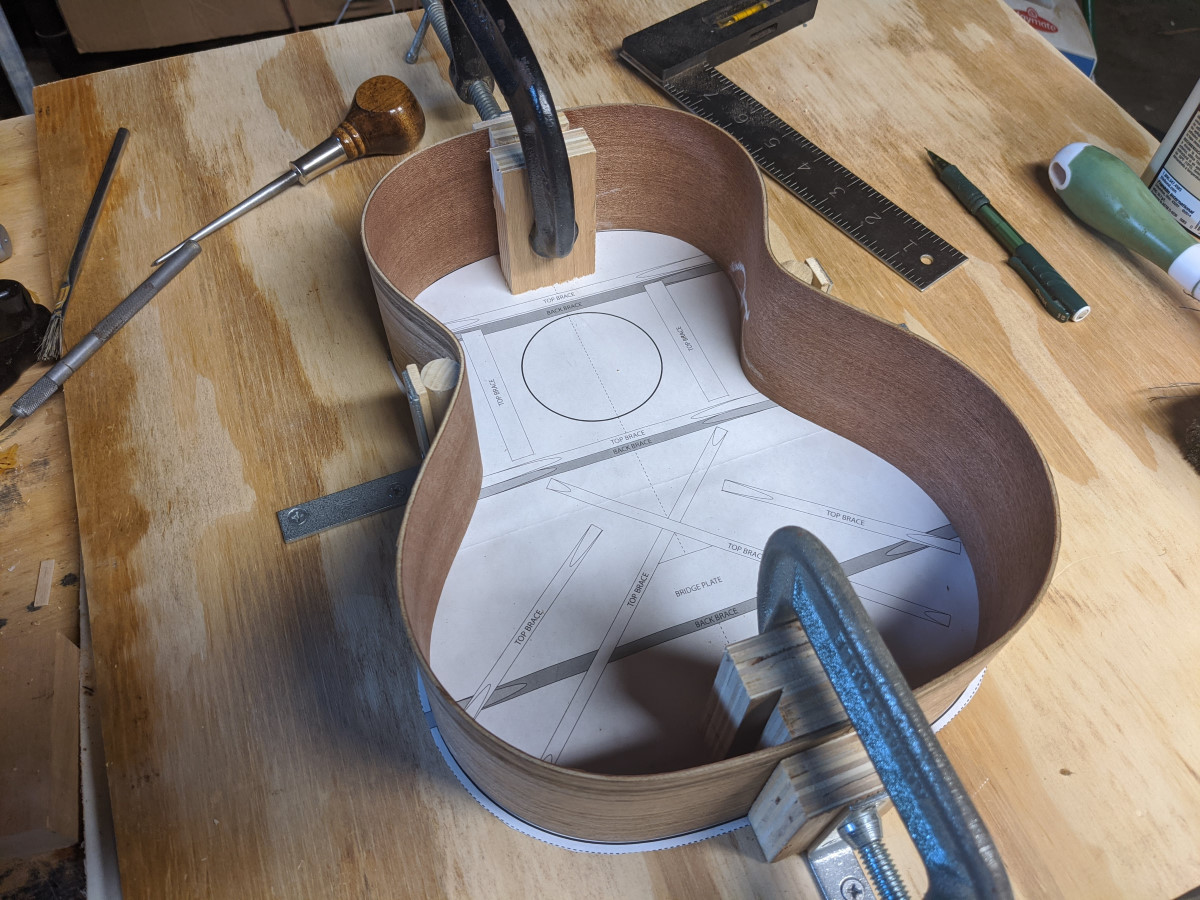
With the back installed, I was able to flip it over in the mold and glue the top on. The top is even more fiddly than the back, because each brace that extends to the edge has to be fitted to not extend past the side and the lining needs to be notched to accommodate the end of the brace. It’s an awkward puzzle, but it’s satisfying to get it all to fit. It’s also a good reason to sharpen a chisel, and a truly sharp chisel is its own joy.
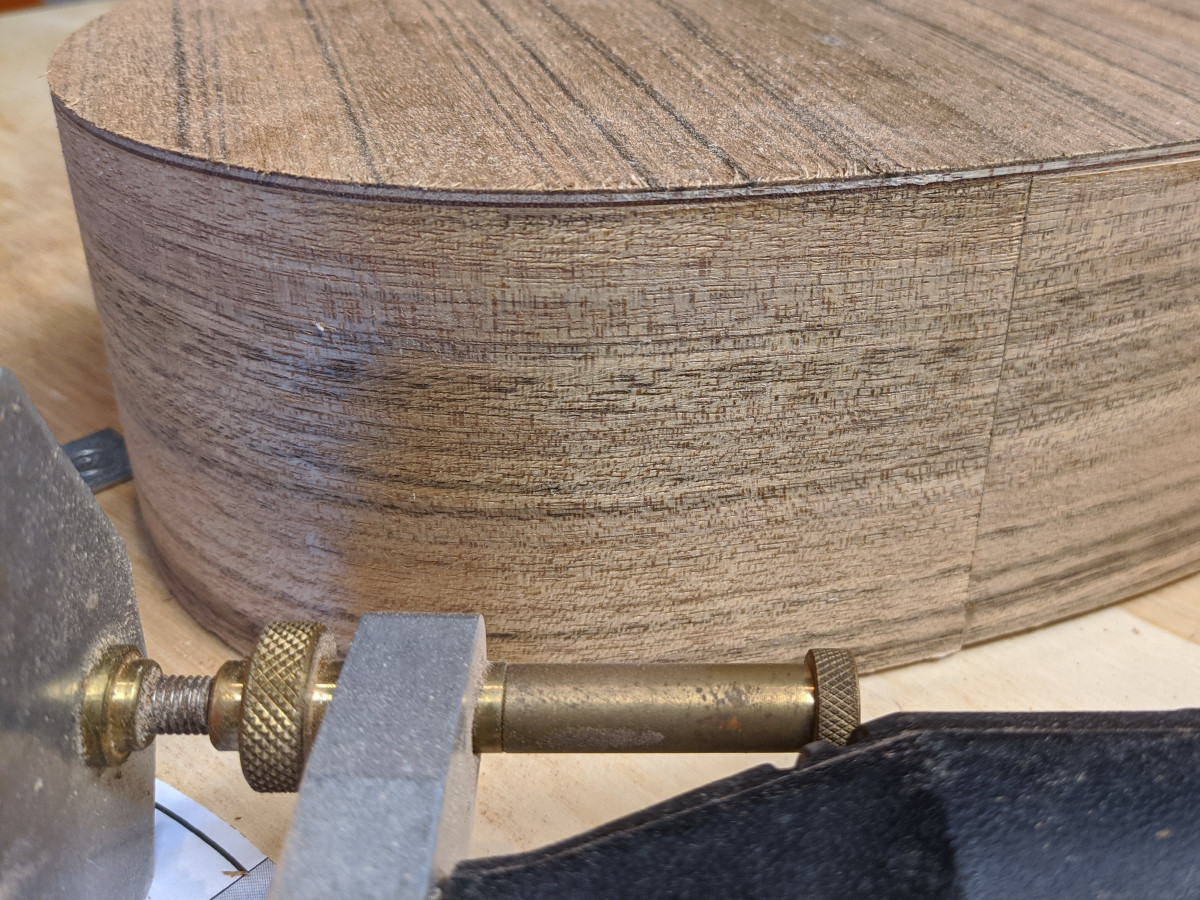
The back and top are slightly larger than the sides, so once it was good and dry, I trimmed the overhang with a Dremel in a router base. I actually bought a laminate trimmer years ago to do this, but I’ve never gotten up the nerve to actually use it for this purpose. It may be entirely in my head, but this is one operation where I really don’t want more power. It’s way too late in the game to catch the grain wrong and blow a piece of the top off, so I just do it very slowly with a bit that’s 10% as hefty as a flush cut bit made for a big-boy router.
While the body was being built, I was also working on the neck. The fretboard is walnut, which I didn’t think would have enough contrast with the walnut body. I’m used to guitars with ebony or rosewood fretboards, and after a lot of back and forth in my head, I wound up dying the fretboard and bridge with India ink. This seems to be an accepted practice, and is used by a lot of instrument manufacturers to make ebony more uniformly black.
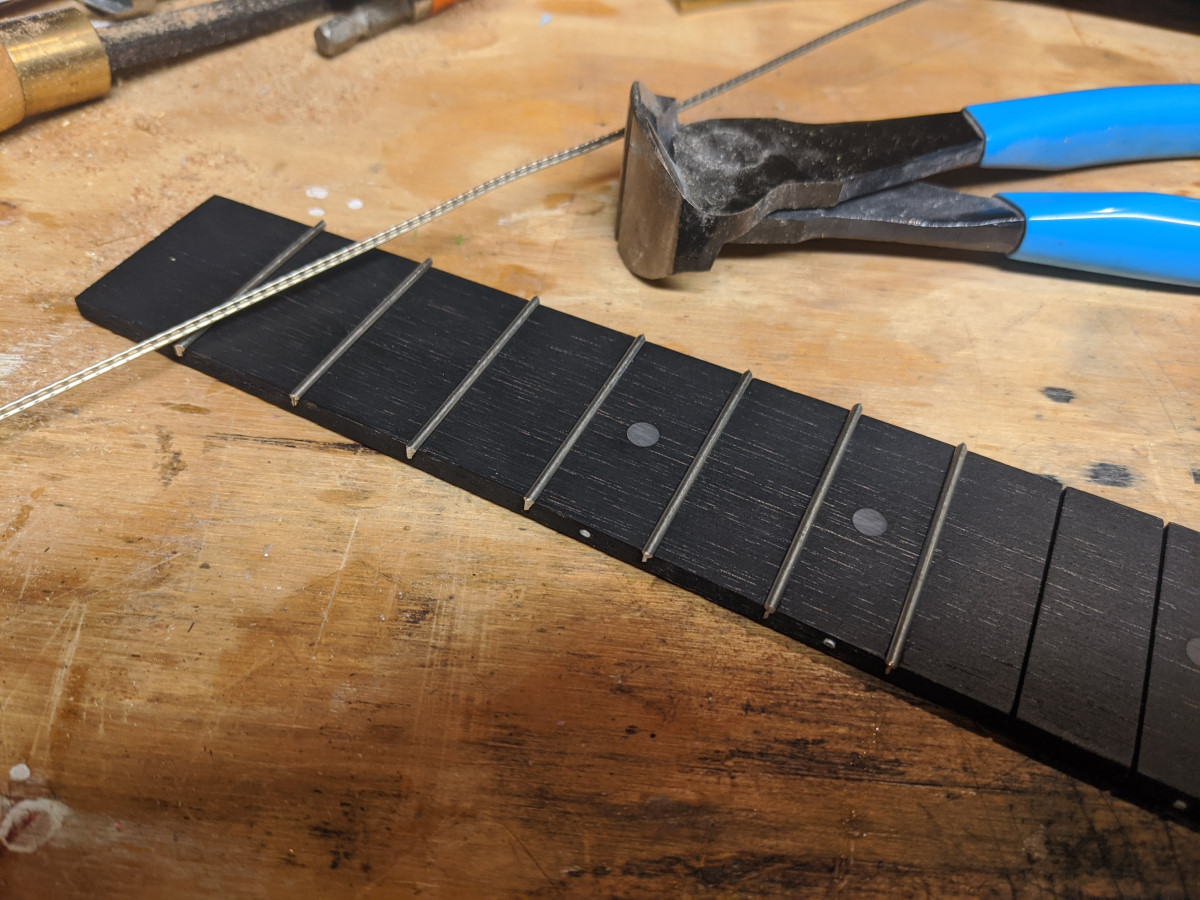
I then installed the side marker dots and started cutting fret wire. I have a dedicated fret press that I made from a Harbor Freight 1/2 ton arbor press and some radiused cauls (I fully expect most things from Harbor Freight to disintegrate, explode, or spontaneously combust for no reason, but sometimes when you just want some un-electrified heavy iron for a stupid price, it hits the spot) although I was surprised to learn that many ukulele fingerboards, including this one, are not radiused. So, I dusted off my old fretting hammer and hammered them in.
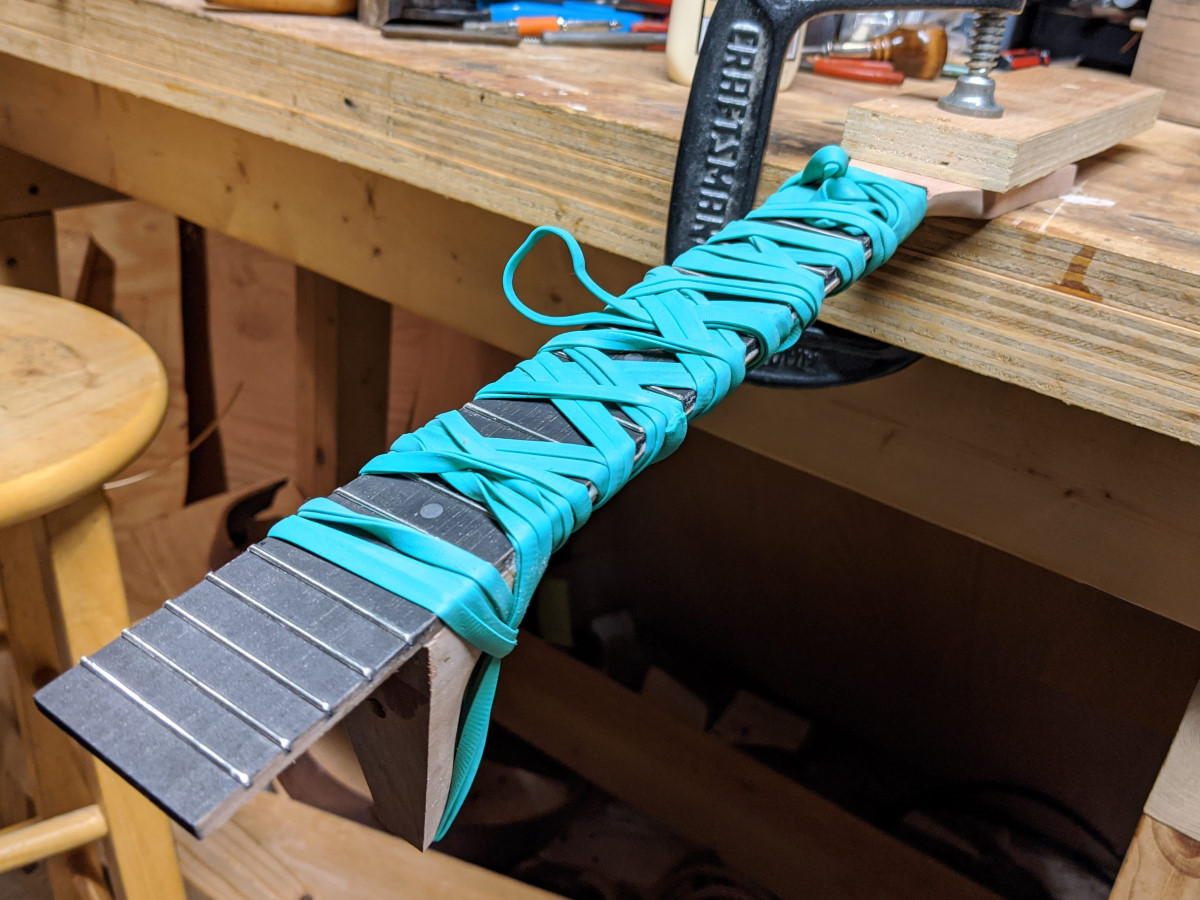
With the frets in, I glued the fingerboard to the neck, which came mostly shaped. This is a situation in which I do like using a rubber band as a clamp, since it has a nice way of centering the fingerboard on the neck as it applies clamping pressure, but I still put a couple spikes in the neck to keep it from sliding around since it’s kind of a sloppy gluing operation with a lot of glue and surface area.
With the fingerboard attached the neck was ready to be fitted to the body.
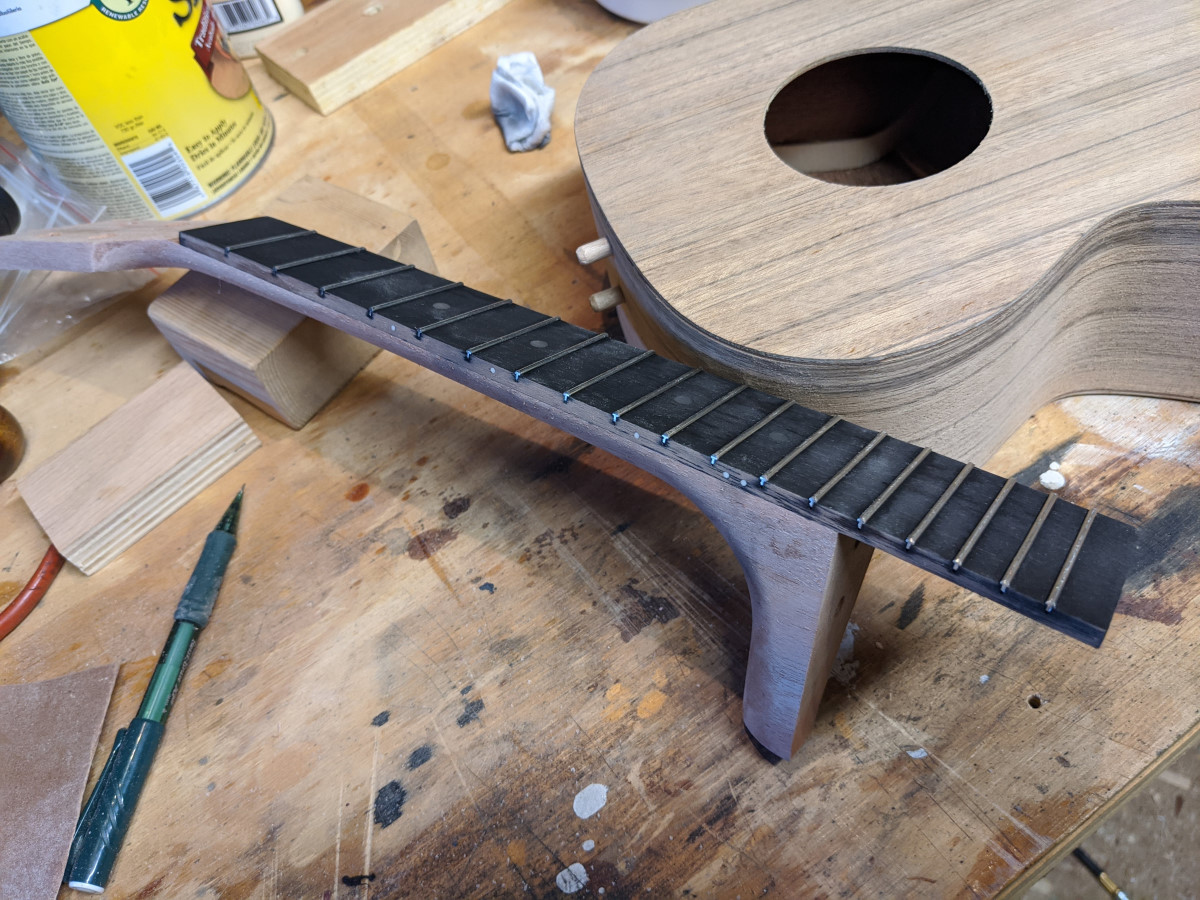
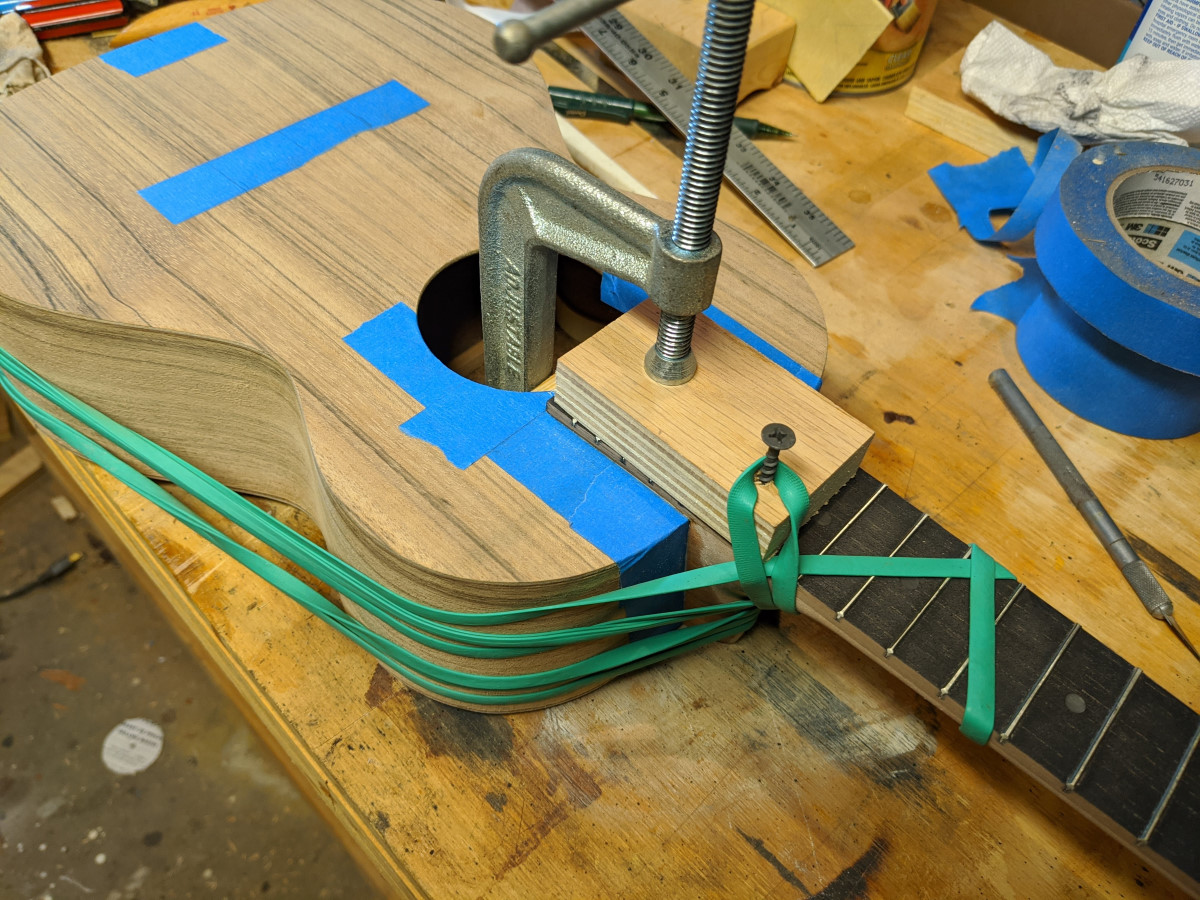
In this kit, the neck is attached to the body with a couple dowels. Guitars often have an extremely secure dovetail joint, but that’s some complicated woodworking, and probably not required with low string tension and such a short lever arm on a ukulele. Still, in order to properly fit the neck to the body, the holes for the dowels need to be drilled pretty precisely, and there’s some sanding and shaping required to have the heel of the neck meet the body correctly and on the instrument’s centerline. Once I got that all dialed in, I was ready for the big glue-up.
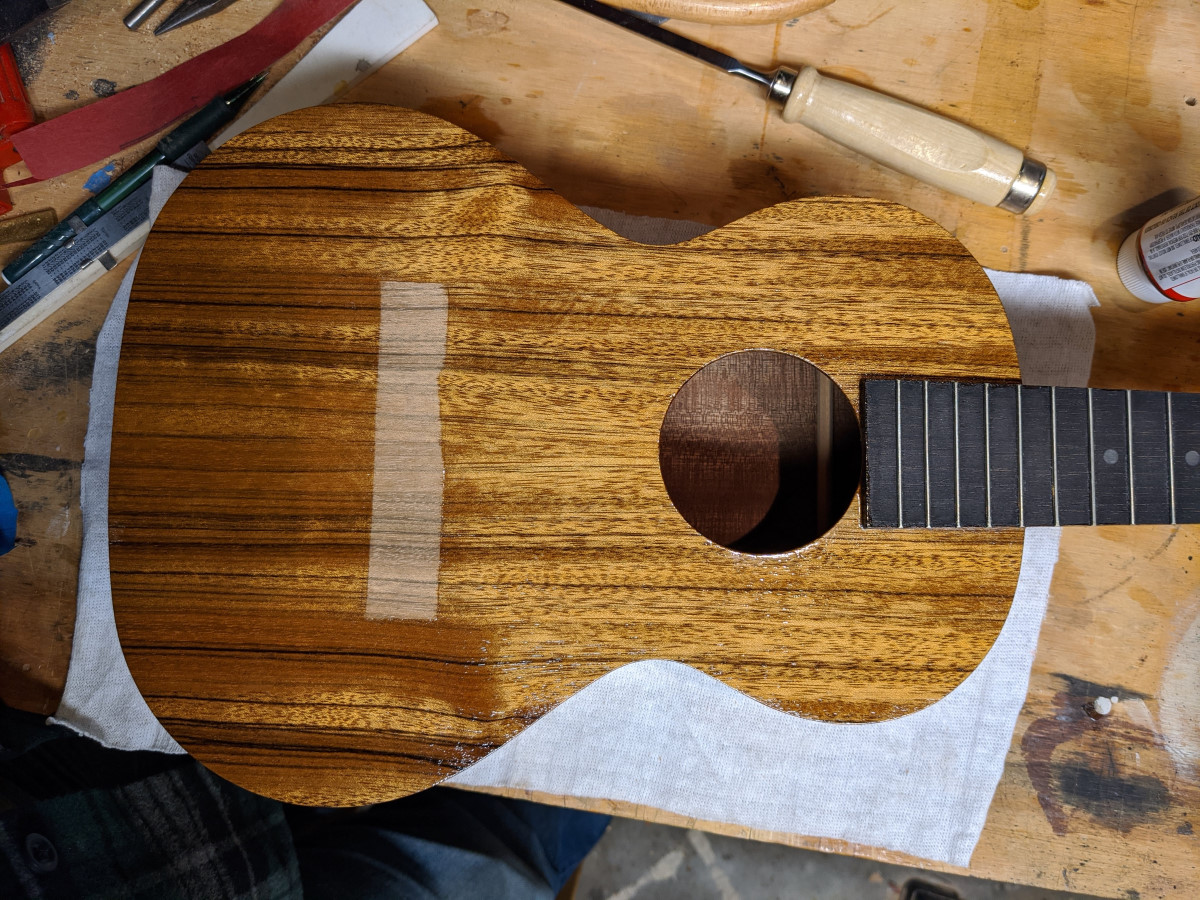
At that point, principal construction was complete. I guess I didn’t take any photos of sanding it, but at some point several steps before, I’d sanded the whole thing to 320, being especially careful not to blow through the veneer in the coarser grits. It’s easier to sand with the neck off, since the spot where the heel meets the body is hard to sand well once it’s together. I left the piece of tape on where I’d marked the location of the bridge and started the finishing process, using the same thing I’ve always used for instruments, Birchwood Casey Tru-Oil. It does a great job of making the grain really stand out, is easy to apply, isn’t very toxic, and can be applied in very thin coats which (in my mind at least) is good for sound production and never looks like plastic.
Something did get a little weird in the finishing process, and I’m not sure what it was. After maybe 4 or 5 coats—half way-ish—the surface felt very rough. There was no particulate matter in the finish that I could see, and it definitely wasn’t just the texture of the wood with no pore filler (I never use pore filler). It felt as if the grain had been raised, even though I had intentionally wet it earlier while sanding the raw wood to raise the grain and sand off any loose fibers. I decided to stop, give it a few days for the finish to harden up, and then wet-sanded it with 600 grit wet/dry paper in naphtha. I cleaned it up and continued with Tru-Oil, and it was completely fine after that. I’m not sure what happened, but I’ve never experienced that before. I threw on a few extra coats to compensate for whatever was removed in the wet sanding process, and in the end, it came out very smooth and shiny.
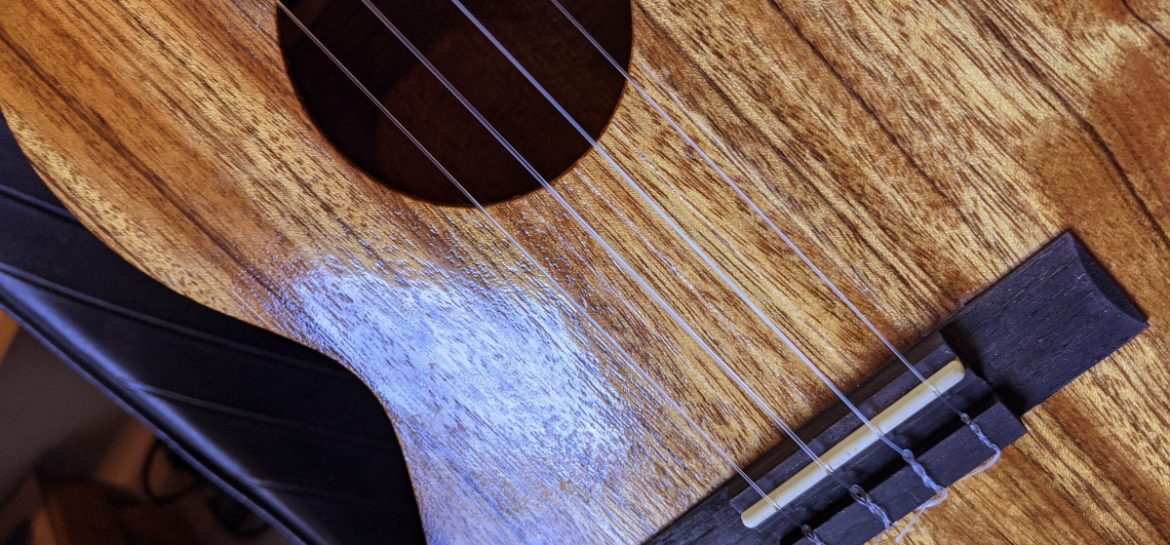
Once the finishing was done, I was able to install the tuning machines, rip off the tape at the bridge to expose an unfinished spot for gluing, and get ready to glue on the bridge. And then, under the agonizing anticipation of having it almost complete, I couldn’t find a clamp that would fit it. I knew for sure that my cam clamps were deep enough, but when I did a dry run, I found that the little ukulele body was too shallow for me to actually get one through the sound hole.
The Lowes website showed that there was a clamp at a local store that might fit it, but I barely trust the Lowes website and I kind of hate going in to physical stores right now. I have found that there are basically two kinds of people in stores at the moment: people who want to get 8 inches away from you and speak directly into your virus receptors, and people who stand 20 feet away from you and yell a critique of your PPE. Still, I was eager to finish this off, so I went to Lowes, parked, put on my bandit mask like I was preparing for a stagecoach robbery, and got out of the car. An employee rounding up shopping carts seemed like he was yelling at me, but I assumed that he was just a Category II “Yelling about my PPE from 20 feet away” type and ignored it until he stopped the carts to reduce their cacophony, removed his welding helmet, and informed me that they were closed. I returned home, said a small prayer to the luthiery gods, and conducted a sacrifice of one of my cam clamps by cutting it up on the band saw until I could jam it through the sound hole.
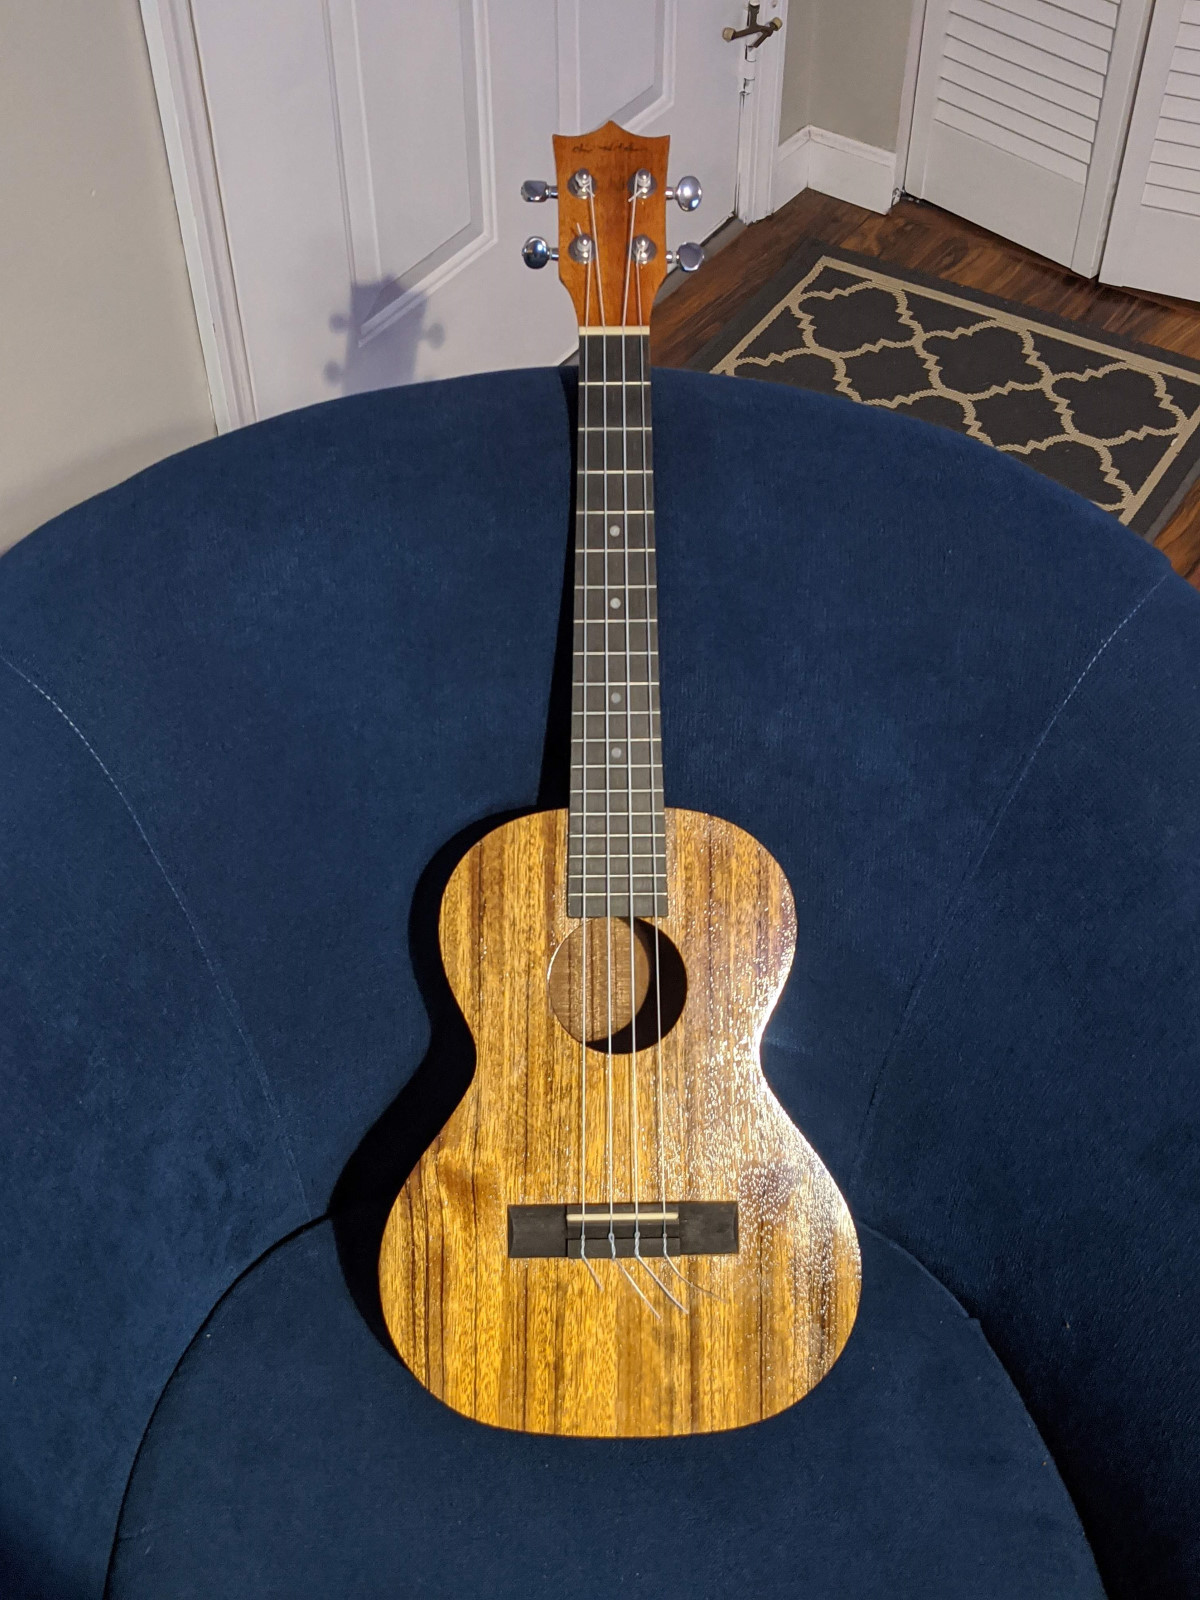
And that’s where ukuleles come from.
Damn nice job Chip! I enjoyed the nearly step by step process you took us through. Now I don’t have to get my own Ukelele kit since I can see yours. When I was little I always heard: “close pins”.
Thanks man. Good to hear from you. Hope everything’s good with you.